


与Hadoop的MapReduce计算框架相比,Spark通过内存计算技术大大减少了磁盘I/O操作,将中间结果存储在内存中,从而实现了数量级的性能提升。同时,Spark提供了ANSI SQL查询和机器学习能力,常用于大规模数据的批处理和流处理。
通过将数据存储在内存中进行计算,Spark能够比基于磁盘的MapReduce快100倍左右。另一方面,Spark的DAG执行引擎能够优化整个数据处理流水线,避免不必要的中间结果写入磁盘的操作。
Spark提供了简洁而强大的API,支持多种编程语言。其核心API包括Spark Core、Spark SQL、Spark Streaming、MLlib和GraphX等组件,为不同的数据处理需求提供了专门的解决方案。开发者可以使用Scala、Java、Python或R语言编写Spark应用程序。
当某个节点出现故障时,Spark能够通过血统机制(lineage)重新计算丢失的数据分区,而不需要像传统系统那样复制整个数据集。这种设计既保证了数据的安全性,又提高了存储效率。
Spark提供了一个统一的计算平台,能够处理批处理、流处理、交互式查询、机器学习等多种不同类型的数据处理任务。这种统一性使得开发者可以在同一个框架下处理不同的数据处理需求,大大简化了系统架构。
Spark设计具有良好的可扩展性,能够在从单机到数千台机器的集群环境中运行。它支持多种集群管理器,包括Spark自带standalone模式、Apache Mesos、Hadoop YARN等。
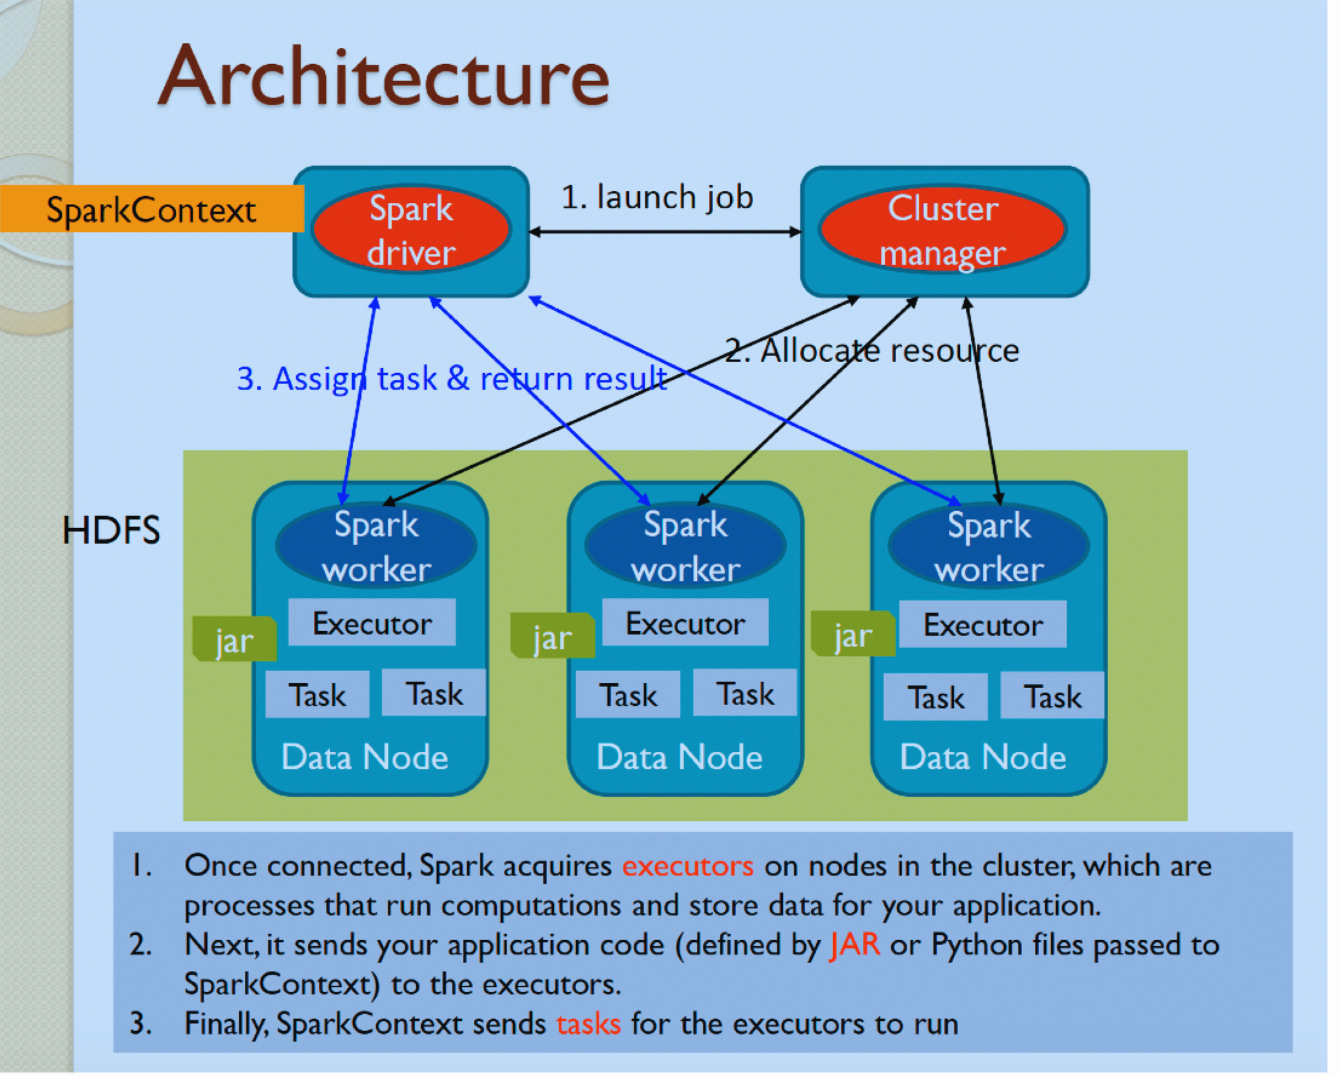
Spark采用了主从(Master-Slave)的分布式架构,主要由以下组件构成:
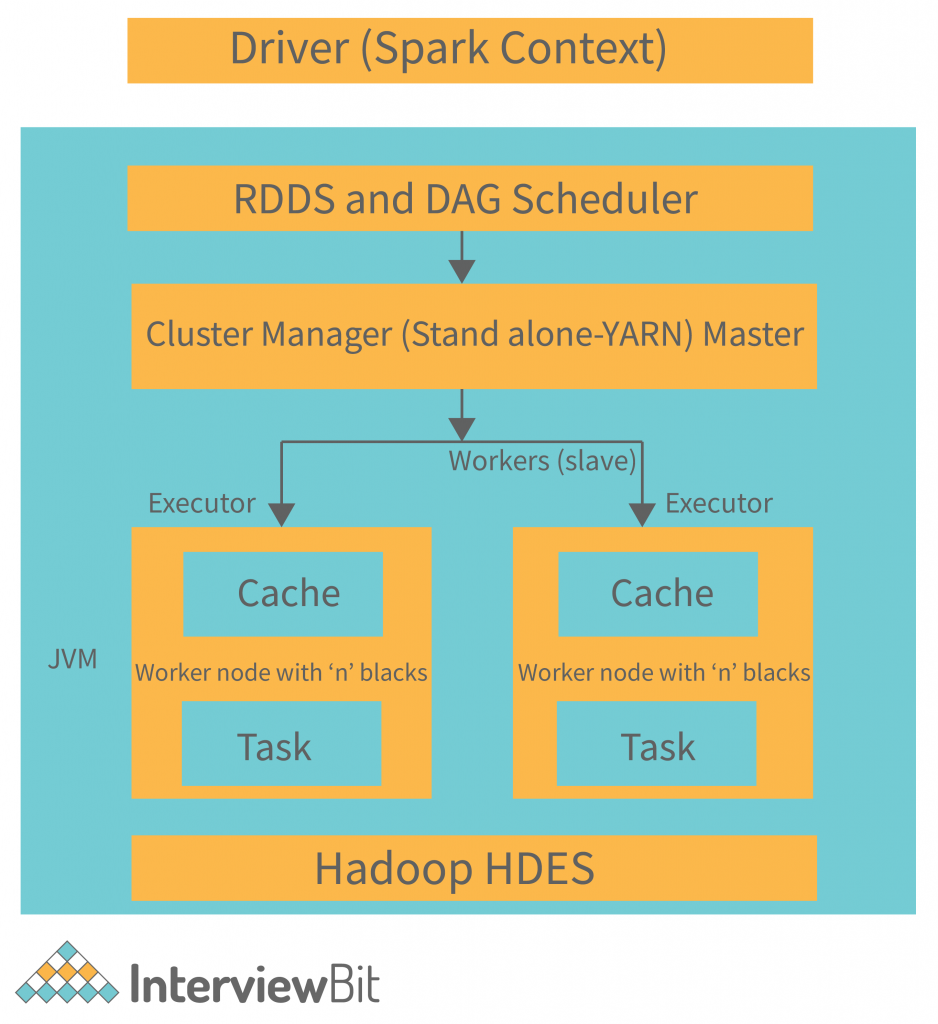
集群管理器负责集群资源的分配和管理。Spark支持多种集群管理器:
驱动程序是Spark应用程序的入口点,负责创建SparkContext并协调整个Spark作业的执行。它分析应用程序,将其转换为DAG(有向无环图),并将任务分发给执行器。
执行器是运行在集群工作节点上的进程,负责执行具体的计算任务。每个执行器管理自己的JVM进程和内存空间,可以并行处理多个任务。
RDD是Spark的核心数据抽象,代表一个不可变、分区的数据集合。它提供了强大的转换和操作能力,同时具有自动容错和负载均衡的特性。在RDD的基础上,Spark提供了更高层次的数据抽象:
当用户提交一个Spark应用程序时,驱动程序会将用户的操作转换为DAG。每个节点代表一个RDD操作,边表示RDD之间的依赖关系。Spark根据DAG的拓扑结构,将任务划分为不同的阶段(stage)。
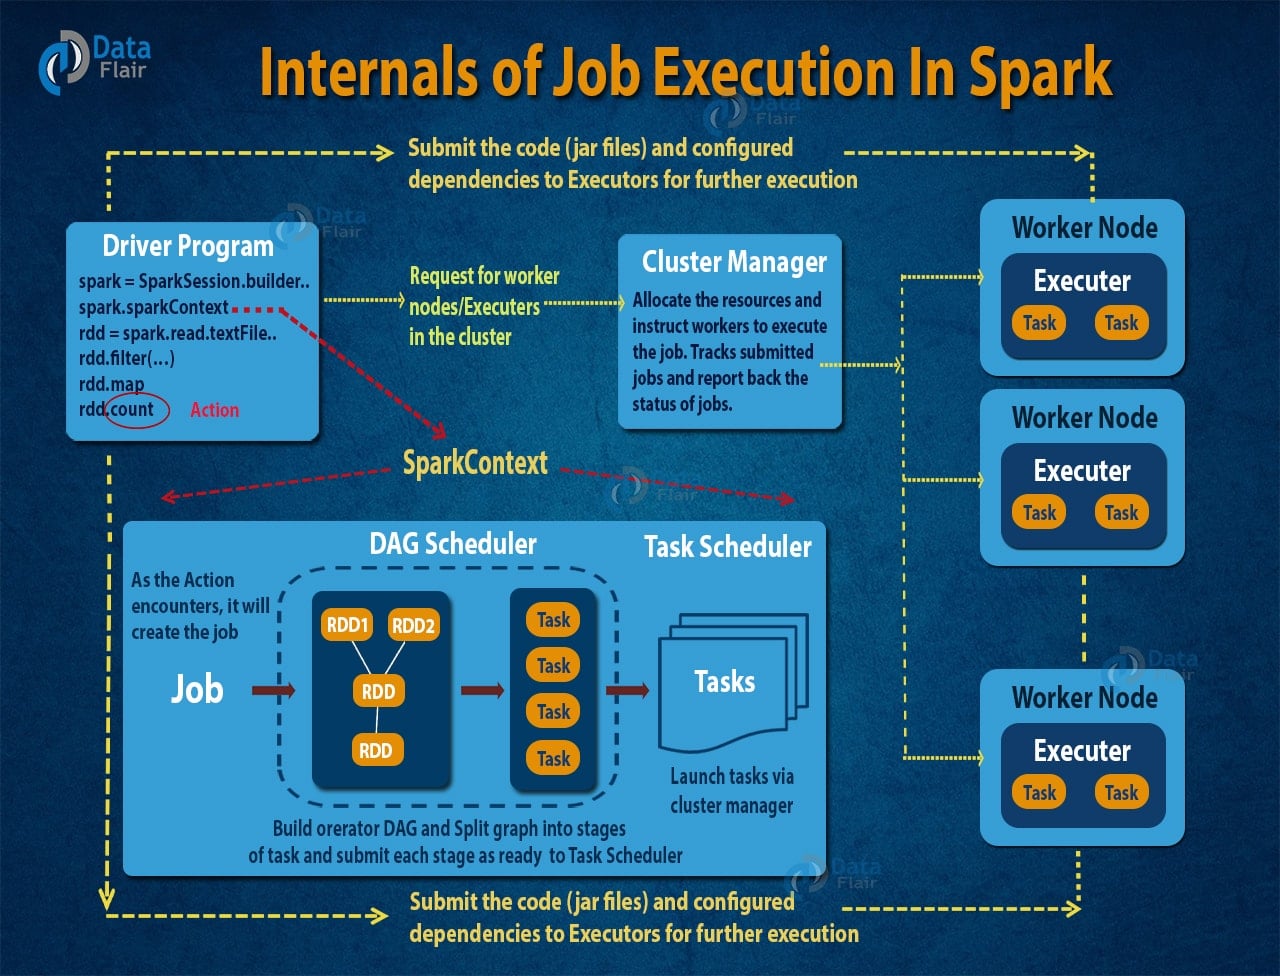
Spark根据shuffle操作将DAG划分为不同的阶段。每个阶段内部的任务可以并行执行,而不同阶段之间需要通过shuffle进行数据交换。这种设计使得Spark能够优化任务的执行顺序,减少磁盘I/O操作。
Spark的核心优势在于其内存计算能力。当RDD被创建时,其分区数据会被加载到执行器的内存中。后续的转换操作直接在内存中进行,大大减少了磁盘I/O。Spark使用了统一内存管理机制,在执行内存和存储内存之间进行动态分配。
Spark通过血统机制(lineage)实现容错。当某个RDD分区丢失时,Spark可以根据原始RDD和一系列转换操作重新计算该分区,而不需要复制整个数据集。这种方法既节省了存储空间,又保证了数据的完整性。
Spark采用了懒评估的策略,只有当遇到行动操作(action operation)时才会真正开始执行计算。这种设计使得Spark能够优化整个执行计划,避免不必要的中间计算。
作为分布式计算框架,Spark在大数据处理领域具有重要的地位。它通过内存计算、DAG执行引擎和统一的数据处理API,成功地解决了传统MapReduce在性能和易用性方面的不足。随着大数据技术的不断发展,Spark持续演进,添加了更多新特性和优化。其生态系统不断壮大,从基础的Spark Core扩展到了Spark SQL、Spark Streaming、MLlib、GraphX等专门的应用领域。Spark的成功不仅推动了分布式计算技术的发展,也为现代数据科学和机器学习应用提供了强大的基础设施支持。在未来,Spark将继续在提升性能、增强易用性和扩展应用场景方面发挥重要作用,为大数据处理和实时分析提供更加高效和便捷的解决方案 。
]]>一个AI增强版draw.io作图网页应用,允许通过自然语言来作图。
]]>温度参数是大模型使用中的一个常见配置。例如xxx模块,有个配置temperature,它就是温度参数。平台对它的解释是:
要使用的采样温度(temperature),介于 0 和 2 之间。较高的值(如 0.8)会使输出更随机,而较低的值(如 0.2)则会使其更加专注和确定。我们通常建议只修改此参数或 top_p 一个参数而不是两个同时修改,默认为1.0, 0表示贪婪采样。
使用xxxSDk时,也会设置温度值:
在大模型中,温度参数(temperature)用来控制输出结果的确定性。该参数值是一个大于0的数值,通常取值范围在0到2之间。当值较低时,对应输出结果确定性较高。反之输出结果确定性较低,随机性较高。
在理解温度参数的基本原理之前,先理解原始分数和Softmax函数。
原始分数
当大模型准备生成一个词时,它会为词汇表中的每一个可能的词计算一个原始分数,也可称为置信度。原始分数表示模型生成每个词的可能性,它们可以是任何实数(正数、负数或零)。原始分数值越大,模型认为这个词越可能出现。
Softmax函数:
Softmax函数又称为归一化指数函数,用于将原始分数转换为可以理解的概率分布(所有词的概率之和为1),该函数用数学表达式可表示为: \(P_i = e^{z_i} / \sum_j e^{z_j}\) 其中$P_i$表示概率,$z_i$表示模型输出的原始分数。
假设模型在生成下一个词时,原始分数的概率分布通过Softmax函数计算。通过温度参数来调整原始分数$z_i$的概率分布,数学表达式如下: \(P_i(T) = e^{z_i / T} / \sum_j e^{z_j / T}\) 从上述数学表达式可看出,当温度值T小于1时,由于原始分数除以一个小于1的数,它的值会被放大,这意味着原始分数之间的差异会增大。经过Softmax函数处理后,高概率词的概率会进一步上升,低概率的词的概率会进一步下降。结果使得概率分布变得尖锐,模型会更强烈地选择偏向于原始分数最高的词,这使得输出结果更加确定。T等于1时,原始概率分布保持不变,
温度值T等于1,保持原始分数的概率分布不变,相当于直接使用模型输出的原始分数进行采样,输出较为平衡。
当温度值T大于1,会缩小原始分数之间的差异。经过Softmax函数后后,高概率词生成的概率会下降,低概率词生成的概率会上升。结果是概率分布变更平台,模型在生成下一个词时,会倾向于从更多不同的词中随机选择,增加了输出结果的随机性和多样性,但可能降低逻辑性。
在配置温度参数的过程中,如果配置较高的数值,会使大模型输出结果更加随机,配置较低的数值则输出结果更加确定。不同的温度值范围有不同的应用场景,例如在低温值(0-0.5)情况下,模型输出的确定性较高,常用于代码生成等对输出一致性要求高的场景。高温值( > 1)则常用于对创造性要求高的场景,例如文学创作、头脑风暴的场景中。在使用过程中因结合实际需求场景来设置温度值,同时根据模型输出的结果来进行调整,达到良好的输出效果。
| 温度值范围 | 输出效果 | 应用场景 |
|---|---|---|
| 低温(0 - 0.5) | 输出确定性高 | 代码生成、法律文本 |
| 中温(0.5 - 1) | 输出确定性和随机性较为平衡 | 对话系统、常规文本 |
| 高温( > 1) | 输出随机性高,更具创造力,但可能导致逻辑混乱 | 文学创作、头脑风暴 |
访问Ollama官方网站下载安装包。
brew install ollama
curl -fsSL https://ollama.com/install.sh | sh
拉取Docker镜像:
docker pull ollama/ollama
安装完成后,执行如下命令查看版本号:
ollama -v
查看使用说明:
ollama -h
结果:
Usage:
  ollama [flags]
  ollama [command]

Available Commands:
  serve       Start ollama
  create      Create a model from a Modelfile
  show        Show information for a model
  run         Run a model
  stop        Stop a running model
  pull        Pull a model from a registry
  push        Push a model to a registry
  list        List models
  ps          List running models
  cp          Copy a model
  rm          Remove a model
  help        Help about any command

Flags:
  -h, --help      help for ollama
  -v, --version   Show version information

Use "ollama [command] --help" for more information about a command.
Ollama基于客户端-服务端架构,执行ollama serve开启服务端。
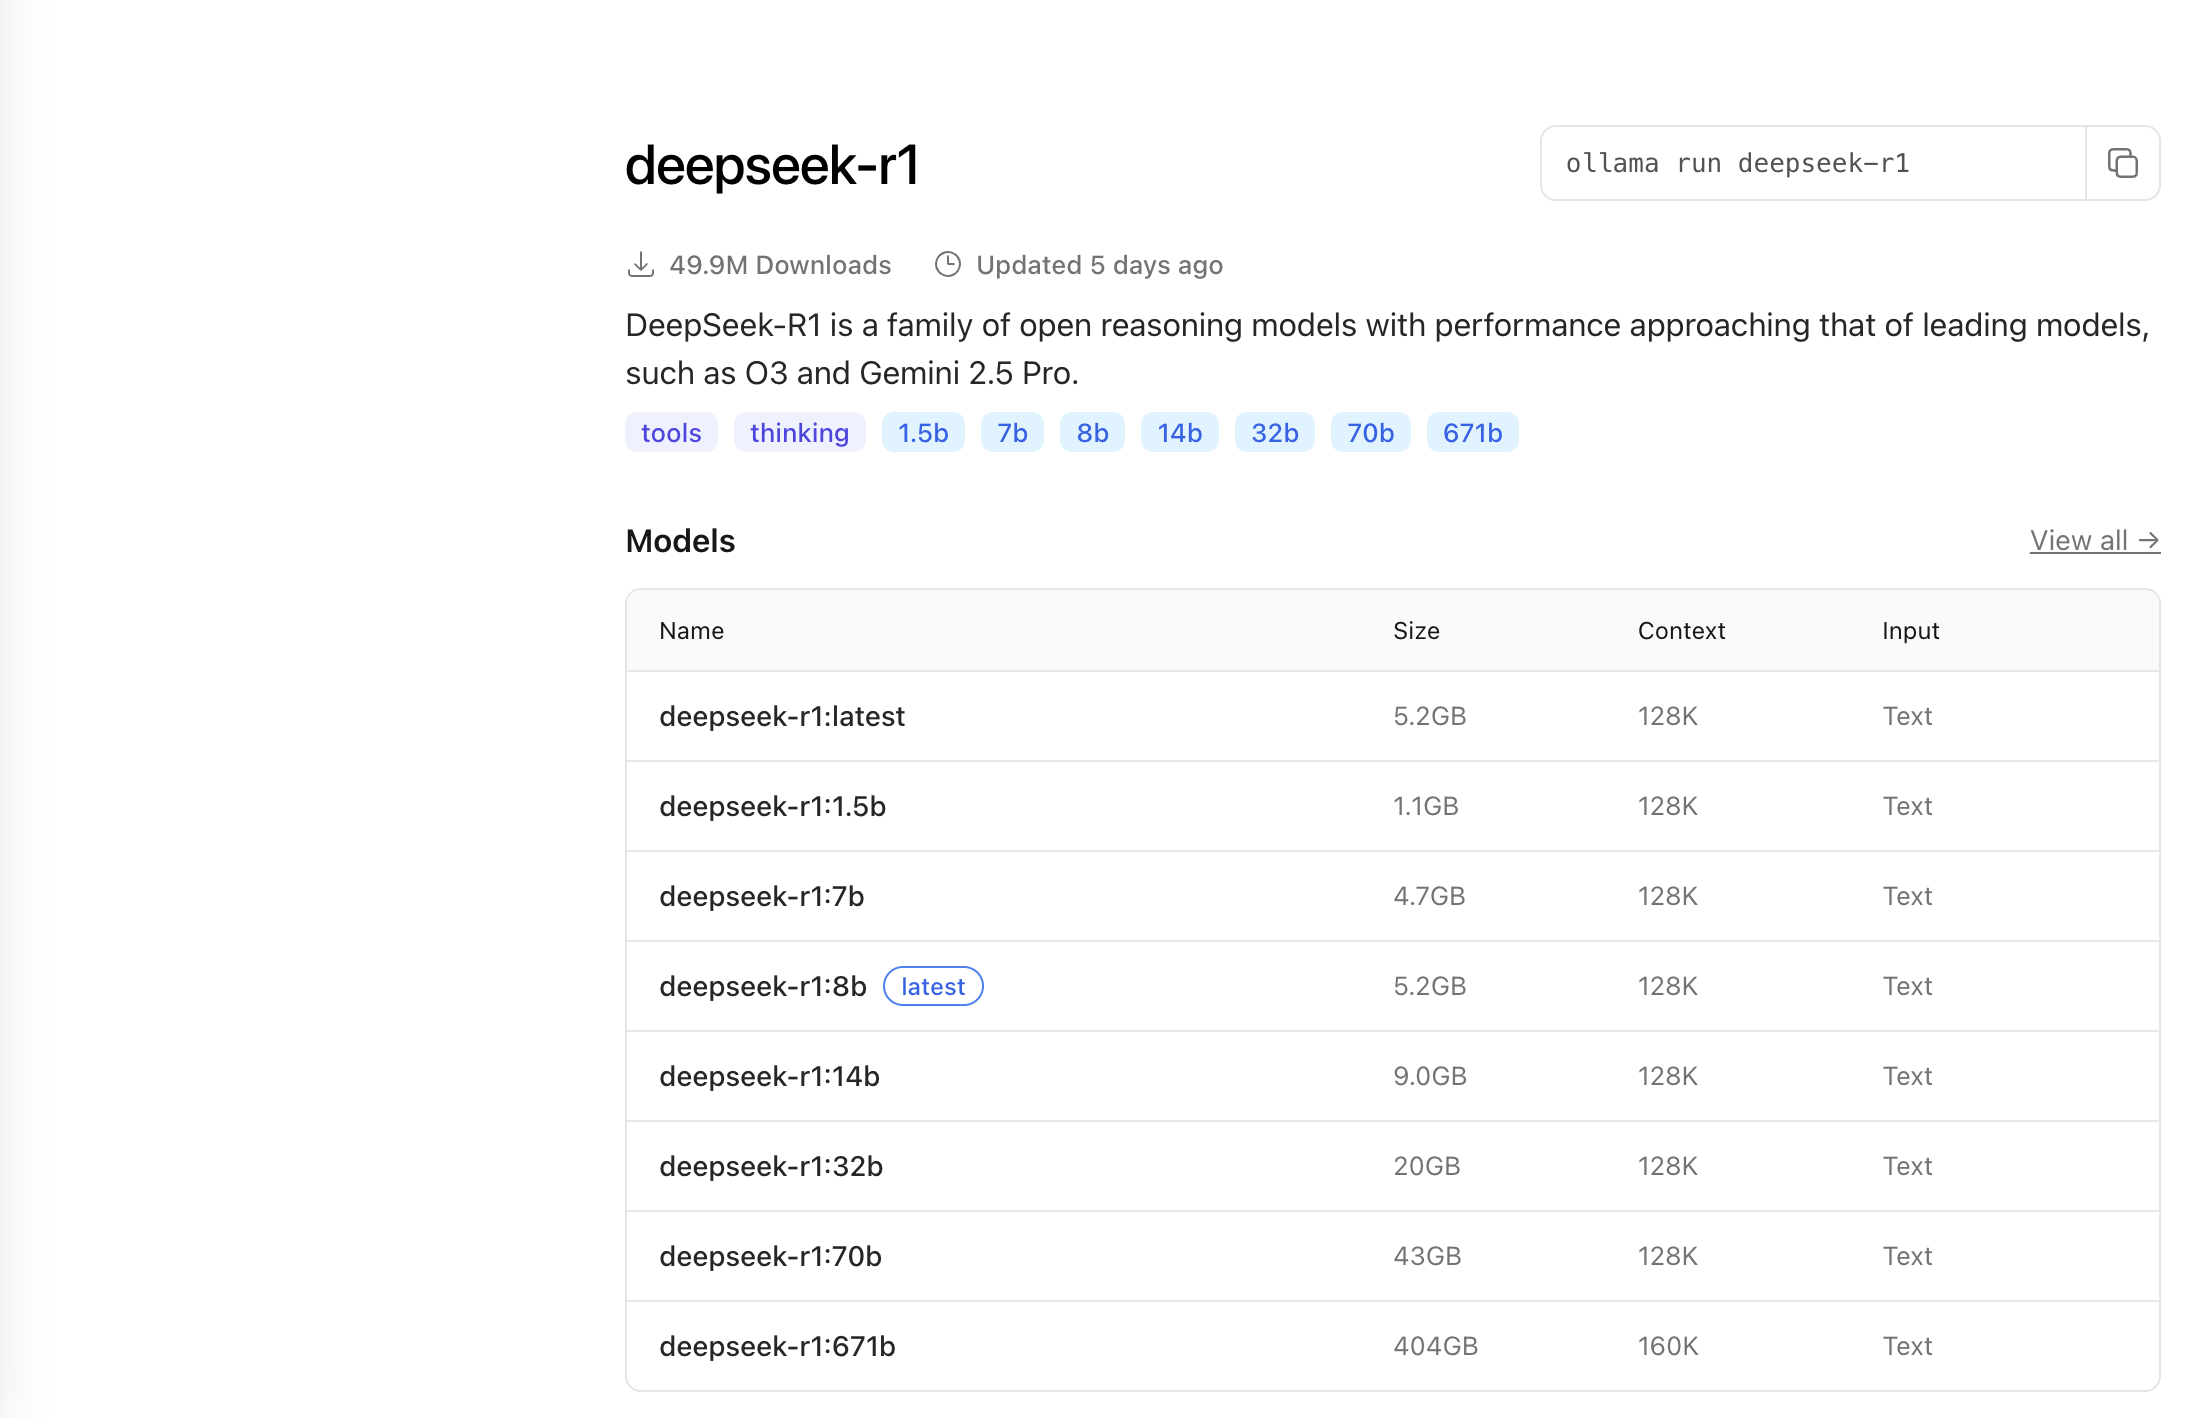
Ollama支持多个模型,例如deepseek-r1和qwen3等,可访问官网模型入口查看具体模型。
点击模型名称,可以看到不同类型的模型:
下载模型:
ollama pull <模型名称>
查看已下载模型:
ollama list
查看模型信息:
ollama show <模型名称>
运行模型(如果本地没有该模型,则会先进行下载):
ollama run <模型名称>
以deepseek-r1:1.5b模型为例,本地运行后,出现命令行交互界面,输入问题后模型返回结果:

Ollama支持创建自定义模型,并且提供了Modelfile文件来管理模型配置,使用自定义模型的好处是可以根据自己需求进行个性化配置。
通过现有模型创建自定义模型:
ollama create <自定义模型名称> -f <Modelfile>
Modelfile是模型配置文件,用于定义和管理模型,可以在其中配置模型温度和随机种子等。
将自定义模型推送到模型库:
ollama push <自定义模型名称>
通过使用Ollama工具,可以很方便地下载和运行模型。Ollama也提供了基于HTTP的API,开发者可通过接口调用的方式和模型进行交互。总之,Ollama类似于软件应用中的Docker,简化了本地配置和部署模型的流程。
]]>很多时候我们迟迟无法下笔,认为文章的序言既不能过于简单而苍白无力,又不能掺杂太多其它信息,导致主题分散。
如何快速构思好文章的序言,并且把主题表达清楚?
我们需要一种结构化表达方法,通过某种结构来组织内容,使其具有逻辑性。
SCQA模型就是这样一种结构化表达方法,来源于麦肯锡咨询顾问芭芭拉·明托(Barbara Minto)的著作《金字塔原理》,通常用于文章的序言或演讲的开场白。其中S,C,Q,A分别是英文单词Situation(背景), Complication(冲突),Q:Question(问题),A:Answer(答案)的缩写。简单来说,这是一种“背景,冲突,问题,答案”的内容结构,首先介绍背景,然后说明发生的冲突,进而引出问题,最后针对该问题给出答案。
使用“背景,冲突,问题,答案”的结构,其中各部分的顺序可以灵活变化。例如,可以开门见山式的给出答案,再介绍背景和冲突。也可以先抛出问题,在后续采用背景,冲突,答案的结构。
使用SCQA模型来组织序言,有以下两个好处:
第一个好处是,通过背景、冲突、问题、答案四个部分,层层推进,逻辑清晰,符合一般的思维习惯。
第二个好处是,对于作者,掌握了这种方法后,有助于快速构思出内容结构。对于读者,更容易被内容所吸引,并产生共鸣。
基于上述优点,SCQA模型的应用非常广泛,在很多演讲、电影和广告中,都能看到这种表达方法的应用。本篇文章的开头就使用了SCQA模型来组织语言,也是一种简单的应用。推荐大家使用这一方法,来提高表达内容的逻辑性。
]]>Head over to the Example Content post for a showcase of Tale’s text formatting features.
Tale works on most if not all modern browsers, including Chrome, Safari and Firefox 👍🏼
Tale is publicly hosted on GitHub, so go ahead and download or fork it at the GitHub repository. If you spot any bugs or have any suggestions, feel free to create an issue or make a pull request.
Thanks for checking out Tale!
风景